The International Trade Blog ![]() Shipping Solutions Software
Shipping Solutions Software
Shipping Solutions Export Software Data Exchange Manager
On: October 31, 2018 | By:  Lisa Nemer |
27 min. read
Lisa Nemer |
27 min. read
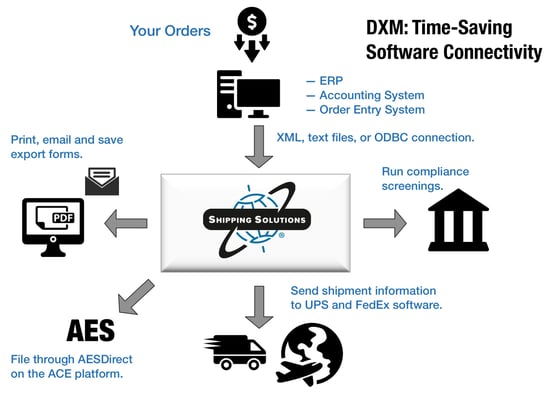 Shipping Solutions Professional includes a Data Exchange Manager (DXM) that allows you to import orders from your company’s accounting, order-entry or ERP system into Shipping Solutions Professional and produce your export documents, file your export information electronically through the Automated Export System (AES), and fulfill your export compliance requirements.
Three Advantages of Using the DXM
There are three primary advantages of using the DXM:
1. Dramatically reduce the time it takes to complete your export documents.
By importing one or more orders into Shipping Solutions Professional, a company may import almost all of the data required to complete the various export forms.
2. Eliminate redundant databases.
Because you are importing an entire order or orders into Shipping Solutions Professional, you are typically importing all the contact and product information from your company’s system. This eliminates the need to import, store and update your contact and product information in the Shipping Solutions databases. Since most accounting, order-entry and ERP systems don’t allow you to store intermediate consignee and freight forwarder information, you may still find it advantageous to use those databases in Shipping Solutions Professional.
3. Reduce data-entry errors.
Because you are importing data from your company’s system, you don’t need to retype important information. No retyping means no chance of new typos.
Three Ways to Use the DXM
There are three primary ways the DXM can be used:
1. File-Based Processing
File-based processing with either text files or an XML file requires that you configure your accounting, order-entry or ERP system to generate a single XML or two delimited text files with your shipment information. The files can include one or more orders and must have specific file names.
Whenever you run the DXM, it will grab the files, based on their names, and automatically insert the information as new shipment records in Shipping Solutions Professional. At this point you can review the imported data, enter any missing data or change any data that needs to be changed, and then create your export documents, file through AES, and run your export compliance screenings.
2. Folder-Based Processing
Folder-based processing also involves one XML file or two text files, but instead of naming them the same way, the DXM pulls all files in a specified folder. You identify the folder that the DXM will monitor and, when the DXM is run, it will check the folder and import the information from the single XML file or the matching delimited text files as new shipment records in Shipping Solutions Professional.
3. ODBC Connection
An ODBC connection allows Shipping Solutions to directly communicate with your business application such as your accounting, order-entry, or ERP system. An ODBC connection is required between the user's computer and your accounting or ERP system. In addition, setup is required to identify the field you want to use to grab the correct shipment record and to identify which fields you want pulled from your ERP system.
Three Ways to Run the DXM
There are three primary ways you can run the DXM:
1. From Within Shipping Solutions
You can run the DXM from within Shipping Solutions Professional by going to the Tools tab and clicking on Run Data Exchange Manager (Import Shipments). This is the only method you can use with an ODBC connection.
2. From a Script
You can run the DXM from a script that calls the dxmRun.exe file, which will initiate the import process. This script could be used to generate the XML file or delimited text files from your accounting or ERP system and then call dxmRun.exe at the end of that process, or it could be part of some other process your company uses.
3. Using a Windows Service
You can install a Windows Service that runs on a schedule and checks the folder you specified in the folder-based processing described above so that whenever a file or files exist in the folder with the proper naming convention, they will be imported into Shipping Solutions Professional.
Create a DXM Project
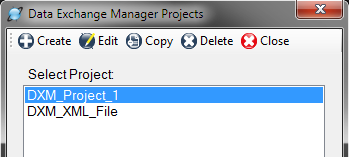 Before you can utilize the DXM, you must first configure it to work with your accounting, order-entry or ERP system. Begin by going to the Admin tab in Shipping Solutions Professional and clicking on Setup Data Exchange Manager.
From here you can choose to create a new project by clicking on Create on the program’s toolbar, or you can choose an existing project from the Select Project list. You can create as many different projects as you need, so you can import data from multiple sources if you wish.
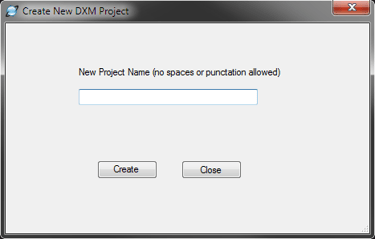 If you choose to create a new project, the Create New DXM Project window will open. Enter a name for this project without any spaces or punctuation, and click the Create button.
Regardless of whether you have decided to create a new project or use an existing project, select that project from the Select Project list and click on the Edit button. This will open the Setup Data Exchange Manager window for this project.
You can choose to import data from your accounting or ERP system into the Shipping Solutions Professional software using comma-, tab- or pipe-delimited text files, using an XML file, or using an ODBC connection. In the File Type box, choose Text-Delimited, XML, or ODBC.
Next choose your Processing Type. Choose either File Based or Folder Based. When using an ODBC connection, the only option is File Based. The File Based processing type requires that you generate an XML file with a specific name or two delimited text files (a header and a detail file) with specific names. The DXM allows you to process one file at a time (or one header/detail pair if you’re working with text-delimited files) or all the files in one folder. To process one file, choose File Based. To process all files in a folder, choose Folder Based.
Continue following the setup instructions below depending on which file type you have chosen. Skip ahead to the section titled Use XML Files if you are using that option. Skip ahead to the section titled Use an ODBC Connection if you are using that option.
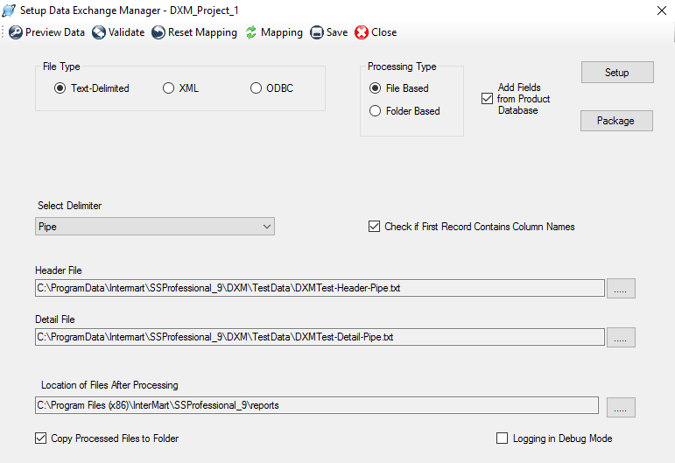
Use Text-Delimited Files
In order to import your orders into Shipping Solutions Professional using text delimited files, you need to create two files from your accounting or ERP system: the header file and the detail file. The header file contains all the information that applies to your entire shipment including exporter, consignee and shipping information. The detail file includes information related to each separate line item of your order. Every order can have multiple line items. The file layout shown in the Shipping Solutions User Guide shows the fields available to import and whether they are in the header or detail file. It also shows the acceptable format for each field.
Both the header and detail files must have a linking field that ensures that the line items for a particular order will always stay tied to that order. The linking field must be the first column in both the header and detail file. If you have field titles, the title of the linking field must be the same in both the header and detail file. Possible options for the linking field include the invoice number or the shipment number. The field used as the linking field can also be used for another field. For example, if you use the invoice number as the linking field, you can still also map it to the invoice number field in the header file.
If you are using folder-based processing, it’s very important you pay close attention to how the files are named. Either the prefix or the suffix of the name must designate whether it is a header or detail file. The rest of the file name must be identical for both file types; for example, NewOrder_Header.txt and NewOrder_Detail.txt.
Once you have created your two text files, complete the Setup screen as described below:
• File Type—Since this is a text-delimited project, click the Text Delimited button.
• Processing Type—The DXM allows you to process one set of header and detail files or all the sets of files in a certain folder. If you will only have one header and detail file to process at a time, choose File Based. If you want all the properly named files in a specified folder to be processed, choose Folder Based.
• Add Fields from Product Database— If you want to supplement the data you are importing from your accounting or ERP system, check this box. Click Setup to designate the fields you wish to supplement. See more information on how to Supplement Data from the Product Database below.
• Package—If you want to zip up the DXM files to be run on a different computer, click Package and identify the location where you wish to save the zip file. This should be done after the setup is complete and fully tested.
• Select Delimiter—Select the type of delimiter that divides your data fields: comma, tab or pipe. Tab or pipe delimiters are recommended especially if your data has commas, which will cause the DXM to misread your data.
• Check if First Record Contains Column Names—Check this box if you have column names in your header and detail files. Column names are recommended to make the data mapping process easier.
• Header File (File Based only)—Click on the ellipsis button to display a search window that will allow you to navigate through your computer to locate the header file of your shipment. Once you have located it, click on the file and then click Open to select it.
• Detail File (File Based only)—Click the ellipsis button to display a search window that will allow you to navigate through your computer to locate the detail file of your shipment. Once you have located it, click on the file and then click Open to select it.
• Source Folder (Folder Based only)—Click the ellipsis button and locate the folder containing the text files to be processed.
• File Part (Folder Based only)—In order for the DXM to know which files contain header information and which files contain detail information, you need to specify the file naming convention you are using. Click either Prefix or Suffix depending on which part of the file name is used, and enter the prefix or suffix in the Header File Part box and Detail File Part For example, if all header files begin “Header” enter “Header” in the Header File Part box.
• Location of Files After Processing—Click the ellipsis button to display a search window that will allow you to navigate through your computer to identify where you would like your text files to be moved after the DXM runs. When moved the processed files will be renamed with the file format YYYYMMDD_HHMMSSXX<filename> where XX is either AM or PM.
• Copy Processed Files to Folder—When you are first setting up a DXM project, you may need to run the import of the delimited text files more than once to ensure the mapping and other configurations are correct. To make this process easier, you should leave this box unchecked so the files you are using to test the import stay in the designated folder. Once your testing is complete, and you are ready to move to the production phase, check this box so the processed files automatically get moved to the folder identified above. For folder-based projects, the box is always checked.
• Logging in Debug Mode—Check this box if you are testing the import process and you want the DXM to write a more detailed log for the file import. The more detailed log may make it easier to diagnose any problems you encounter during the setup process.
You must now map the fields in your text files to the fields in Shipping Solutions Professional. For a detailed list of all the fields available for mapping, see the Data Exchange Manager File Structure located in the Shipping Solutions User Guide on page 186.
If you already have mapping in place and have changed the text files significantly or just want to start over with your mapping, click Reset Mapping. This will wipe out all the mapping, so only click this button if you are sure you want to start over. To begin or continue the mapping process click Mapping.
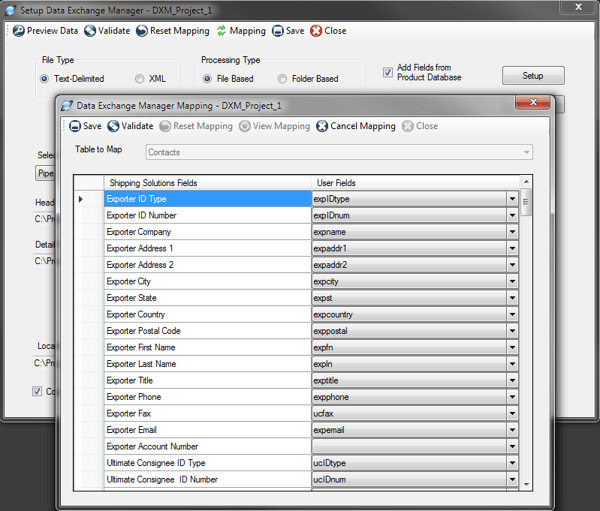
Mapping Data Fields Using the DXM
The Shipping Solutions fields are divided into six tables. Begin by highlighting Contacts in the Table to Map drop-down list. The Shipping Solutions fields are listed in the left column. Click on the drop-down list in the right column. You should see your column headings from your header file. If you do not have column headings, the fields will appear as A0, A1, A2, etc.
For each Shipping Solutions field choose the corresponding field in your text file from the drop-down list. You do not need to map every field; only map the fields for which you have data. Click Save. You must move off a mapped field before saving in order for that field to be saved. If you want to exit the data mapping screen without saving your changes, click Cancel Mapping.
Next select the Header-Invoice table and repeat the process. Continue down the list of tables mapping all the information you have in your header and detail text files. You do not have to map all of the tables. Click View Mapping to view or print a list of the fields you have mapped. Click View All Fields to see all fields available for mapping, and then click View Mapped Fields to see just what you’ve mapped.
Click Close to close the Data Mapping screen.
Configuring the DXM Using a Single XML File
Instead of text files, Shipping Solutions users can configure the DXM to use a single XML file. Working with the XML data format in the Data Exchange Manager greatly simplifies the process of moving data from your accounting or ERP system into Shipping Solutions Professional. However, it does require that the files conform to the schema provided with the software.
The schema is in the c:\Program Data\InterMart\SSProfessional_9\DXM\schemas folder. The ssdataDXMschema_09.xsd schema provides XML structure validation and validation of elements to correspond to the database’s expected data types, and in some cases, the fields’ allowed values. For a detailed list of all the fields, see the Data Exchange Manager File Structure located in the Shipping Solutions User Guide on page 186.
If you look at the schema, you will see that the following tables are required: tbl_doc_header, tbl_document_contacts, and tbl_item_details. The other tables are optional. The tables must be in the order that they appear in the schema, but the elements within the tables can be in any order. None of the elements are required.
The docsets element must define the schema location and namespace as shown below:
XML Header Info
<?xml version="1.0" encoding="utf-8"?>
<docsets xmlns:xsi="http://www.w3.org/2001/XMLSchema-instance"
xmlns="urn:SsproNamespace"
xsi:schemaLocation="urn:SsproNamespace ssdataDXMschema_09.xsd">
<docset>
Your Document XML as defined by the schema.
<docset>
</docsets>
Follow the steps below to complete the setup screen:
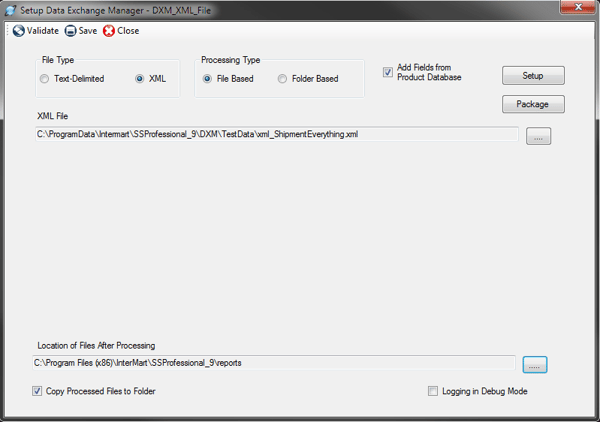
• File Type—Since this is an XML project, click XML.
• Processing Types—The DXM allows you to process one XML file with a consistent name or all files in a folder. If you want to process one file at a time, choose File Based. If you want to process all files in a folder, choose Folder Based.
• Add Fields from Product Database—If you want to supplement the data you are importing from your accounting or ERP system, check this box. Click Setup to designate the fields you wish to supplement. See Supplement Data from the Product Database below for more information.
• Package—If you want to zip up the DXM files to be run on a different computer, click Package and identify the location where you wish to save the zip file. This should be done after the setup is complete and fully tested.
• XML File (file-based only)—Click the ellipses button and navigate to the location of your XML file.
• Source Folder (folder-based only)—Click the ellipses button and navigate to the location of the folder containing your XML files.
• Location of Files After Processing—Click the ellipsis button to display a search window that will allow you to navigate through your computer to identify where you would like your text files to be moved after the DXM runs. When moved the processed files will be renamed with the file format YYYYMMDD_HHMMSSXX<filename> where XX is either AM or PM.
• Copy Processed Files to Folder—When you are first setting up a DXM project, you may need to run the import of the delimited text files more than once to ensure the mapping and other configurations are correct. To make this process easier, you should leave this box unchecked so the files you are using to test the import stay in the designated folder. Once your testing is complete, and you are ready to move to the production phase, check this box so the processed files automatically get moved to the folder identified above. For folder-based projects, the box is always checked.
• Logging in Debug Mode—Check this box if you are testing the import process and you want the DXM to write a more detailed log entry for the file import. The more detailed log entry may make it easier to diagnose any problems you encounter during the setup process.
Setting Up the DXM Using an ODBC Connection
Shipping Solutions Data Exchange Manager (DXM) includes an ODBC connection option, which allows Shipping Solutions to directly communicate with your business application such as your ERP, accounting or order-entry system. Your application must be ODBC-compliant (Open Database Connectivity) and you must first establish an ODBC connection with your business application.
You should consult with your IT department before proceeding with setting up the ODBC connection. In general, the steps to setup the ODBC connection are:
1. On the computer running the Shipping Solutions client, open the ODBC Data Source Administrator window.
- On a Windows 8 or 10 machine just click the Start button in the lower-left corner of your computer and start typing ODBC.
- On older operating systems, open the Control Panel and double-click the option called Data Sources (ODBC) or Setup up Data Sources (ODBC).
- If you are given a choice between 32-bit and 64-bit version, choose the 64-bit version.
2. On the ODBC Data Source Administrator window click the System DNS tab.
3. Click Add and choose the correct driver for your data source. You may have to download the correct driver from your ERP system vendor. Click Finish.
4. Give your data source a name (a DSN), a description and choose the SQL Server to connect to.
5. Use the ODBC data source wizard to complete the connection.
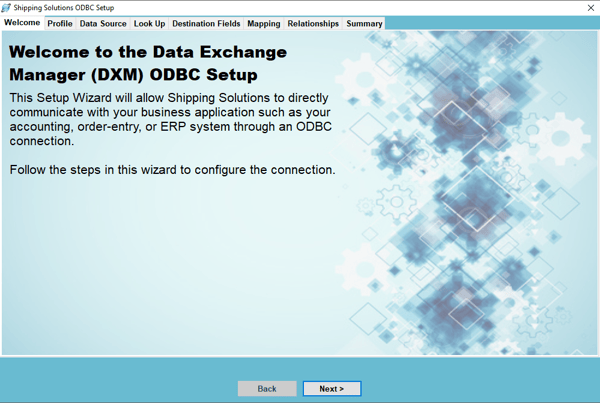
Once you have created the ODBC connection with your accounting or ERP system, go to the Admin tab, Setup Data Exchange Manager for ODBC screen. Review the Welcome screen and click Next. Complete the steps on each of the tabs outlined below to configure the setup with Shipping Solutions Professional.
Profile Tab
Create a new profile or edit an existing profile. If you choose Edit an existing profile, a grid will pop up showing your existing profiles. You can delete existing profiles or select one to edit and click Next. If you choose to Create a new profile, a box will pop up where you can enter the name of your new profile.
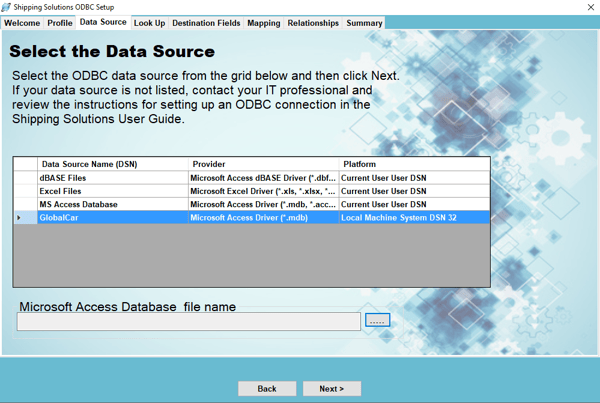
Data Source Tab
On this tab you identify the source of your shipment information. The databases that you can connect to via ODBC are listed in the box. Select the data source name and click Next. If your data source is not listed, contact your IT professional and review the general instructions above for setting up an ODBC connection.
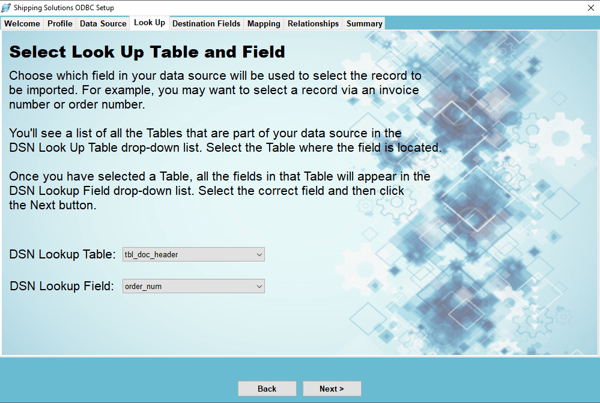
Look Up Tab
On this screen you identify the field you want to look up in order to import the correct shipment information. For example, you may want to pull in shipment records via an invoice number or order number. All of the tables and views in your data source are listed in the DSN Look Up Table drop-down list. Select the table or view where the field is located. Once you have chosen the table, the possible fields will appear in the DSN Look Up Field drop-down list. Select the correct field. Click Next.
Destination Fields Tab
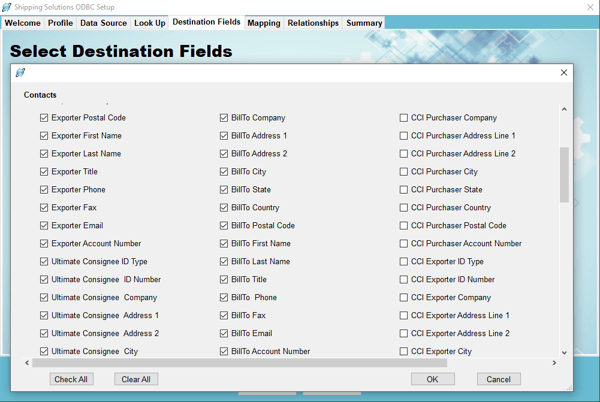
Now you need to identify which fields in Shipping Solutions you will be populating with information from your data source. The fields available in Shipping Solutions are divided into six groups. Click each group and check the boxes next to the fields you want to populate with information from your data source. You can also select fields that you want to populate with a default value. None of the fields are required.
The Contacts group includes names and addresses for all the parties in your shipment from your exporter information to the name and address of the ultimate consignee to the NAFTA producer plus many more. The Header-Invoice group includes much of the information needed for your commercial or proforma invoice and your AESDirect filing such as the commercial invoice date, commercial invoice number, and the exporting carrier. The Product Info group includes all the information about your line items such as product description, unit price and weight.
The last three groups are used less frequently than the first three because your ERP system may not include fields that are specific to exporting. The NAFTA/Free Trade/Canada Customs/CARICOM group includes fields that appear on those documents, such as NAFTA blanket dates, the Condition of Sale that appears on the Canada Customs Invoice and the Presenting Bank shown on the CARICOM invoice. The Ocean BL/IATA/IMO/Inland BL group includes fields specific to the ocean and air waybill and the dangerous goods documents. Finally, the Shipper’s Letter of Instruction group includes fields for that document, such as various fees.
There is a Check All box on each group’s screen. However, please note that you will need to map every field that is checked and each group contains many fields, so there is probably no circumstance where you would want to use the Check All box.
When you have finished selecting the fields, click Next.
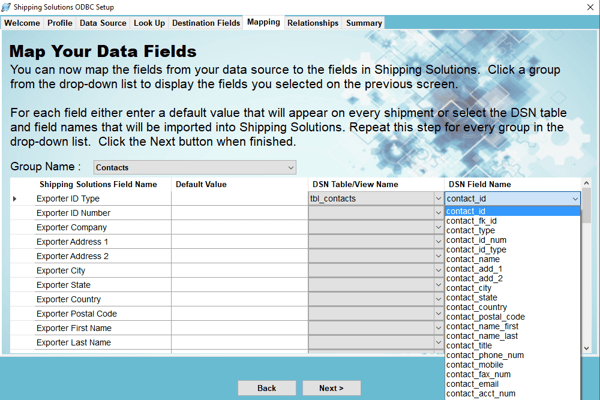
Mapping Tab
Now you need to identify which field in your data source maps to each field you checked on the Destination Fields tab. The groups you used on the Destination Fields tab will appear in the drop-down list. Select a group. The fields you checked on the Destination Fields tab will appear in the first column.
The second column can be used to enter a default value for this field. For example, you may want to enter a default value for your company name and address. The default value will remain the same for every shipment.
However, most fields will use the third and fourth column only. All the tables and views in your data source will appear in the drop-down list of the DSN Table/View Name column. Select the correct table or view for the first field. Field names from the table or view you selected will appear in the DSN Field Name column. Select the correct field that corresponds to the Shipping Solutions Field Name.
Map each group that appears in the drop-down list. Then click Next.
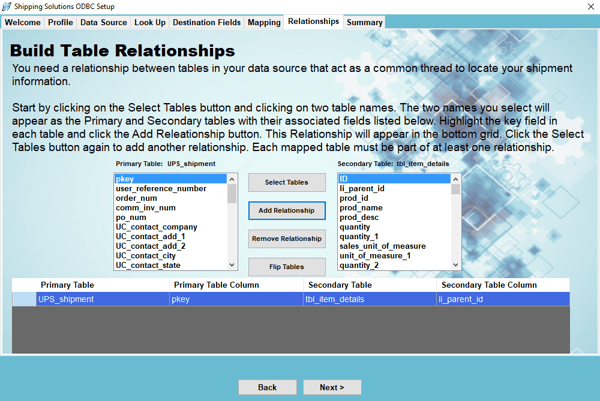
Relationships Tab
This tab is more complicated than the other tabs and requires a thorough knowledge of your data source, meaning your accounting, order-entry or ERP system.
This screen builds the relationships between the tables. A relationship is built between two matching fields where one field is in each table. For example, the matching field might be the order number, invoice number or another field that is not even part of the shipment data. You will need a relationship between each table in the data source that will act as a common thread to locate the information about a specific shipment throughout the various tables.
To add a relationship, click the Select Tables button. Each of the tables you used on the Mapping tab will appear in the list. If you need to build a relationship with a table that you did not use on the Mapping tab, click the All button to see all tables in your data source. Select two tables. One table will appear as the Primary Table and the other table will appear as the Secondary Table.
If you want to switch the two tables you can use the Flip Tables button. Flipping the tables may be necessary if you need to build a bridge between two tables that includes a third table not used in the mapping. The fields in each table will appear in the boxes below the table names. Highlight a field in each box and click Add Relationship. The relationship will show up in the grid below. Click Select Tables again to add another relationship. You can use a table in more than one relationship, but you must have at least one relationship for each table. Continue building relationships until all tables have been used. Then click Next.
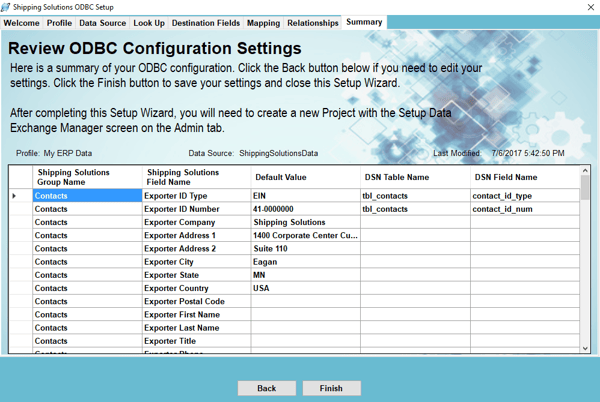
Summary Tab
This tab shows a summary of your ODBC configuration. Click the Back button to edit any settings. Click the Finish button to save your settings and close the Setup Wizard.
Create your ODBC DXM Project
Once you have setup your ODBC connection and setup the ODBC configuration, you must create a Data Exchange Manager (DXM) project. Go to the Admin tab, Setup Data Exchange Manager screen. Click Create to create a new project, Edit to edit an existing project or Copy to copy an existing project.
In the File Type box choose ODBC. In the Profile box type the name of the profile you just setup. You can also use the Add Fields from Product Database check box to supplement the data from your accounting or ERP system with data stored in the Shipping Solutions Product Database. Continue to the next section for more information.
While you are testing the DXM project, check the Logging in Debug Mode box. This will provide more detailed logging in case of errors. Save and Close your project.
Supplement Data from the Shipping Solutions Products Database
Many accounting and ERP systems that companies use are biased towards domestic orders and therefore may not include all the product information that may be required on your export forms. For example, the Schedule B or Harmonized Tariff System (HTS) code may not be stored with the rest of your product information.
If that is the case, Shipping Solutions Professional software users will need to manually add the missing data for each product on every export shipment imported from your accounting system. Alternately, you can automate the process of supplementing the missing data in one of two ways:
- You can store the missing data in a table on your server and then reference that table of additional data in the script your company writes to create either the delimited text files or the XML file required for importing your orders into Shipping Solutions Professional using the DXM.
- You can turn on the feature in the DXM that pulls missing data from the Shipping Solutions Professional’s Products Database.
If you choose the second option for adding the missing product data, you can import the data into the Products Database. Refer to the Shipping Solutions User Guide for instructions on importing data into the Shipping Solutions database.
In order for this tool to work and add the selected data fields to any orders you import from your accounting system, the DXM utilizes the Product ID field for each line item imported. The products you reference during the import process must include a Product ID, and that Product ID must be unique for each item.
Once you are sure you have data in the Shipping Solutions Professional Products Database, click the Add Fields from Product Database check box, and then click on the Setup button in the upper-right corner of the Setup Data Exchange Manager window. It will open the Select Fields to Update window.
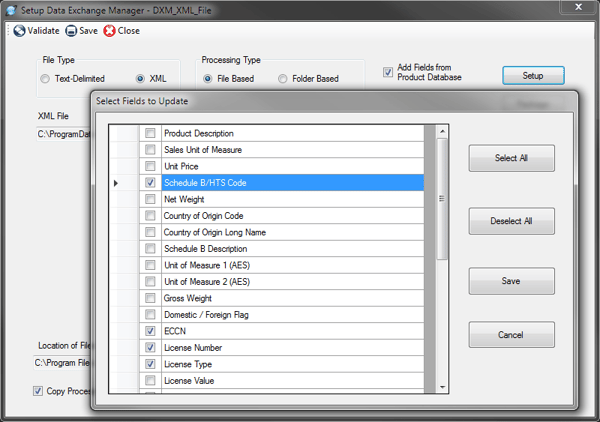
From this window, check on the box next to the data fields you want to be added from the Products Database to your orders after importing from your accounting system. Once you have selected one or more fields, click on the Save button to close the window and return to the main Setup window.
If you are selecting Preference Criteria, Producer Code, or Country of Origin (FTA), be sure to also check the matching key field.For example, in addition to choosing “Preference Criteria,” you also need to select “Preference Criteria Key” or this information won’t correctly appear on the EZ Start screen or the appropriate export forms.
Running the DXM
Once you have the Data Exchange Manager configured to be able to import your order information from your accounting, order-entry or ERP system, you have three choices for running the DXM: (1) from within Shipping Solutions, (2) from a script, and (3) as a Windows Service. For ODBC projects, you only have the option to run the DXM from within Shipping Solutions.
Run from Shipping Solutions
A user can manually run the DXM at any time by going to the Shipping Solutions Tools tab and clicking on Run Data Exchange Manager (Import Shipments). From this window, select a Project from the drop-down list. Once you select a project, the top window will indicate if there are any files that match the parameters set up in this particular project and are ready to process or if anything is missing. The bottom box will show you the project parameters. If you have selected a folder-based project, a Process All Files check box will appear. Check this box to process all the files without stopping.
For ODBC projects, a Lookup ID box will appear. Enter the value for the shipment you want to import. The value is defined on the Admin tab’s Setup Data Exchange Manager for ODBC screen.
To process, click the Run button on the toolbar. The bottom box will then display the file as it is being processed and should end with “Shipment ID’s Inserted [x]” where “x” is the Shipment Number inserted into your Shipping Solutions database. If there are errors, you can click the View Log button on the toolbar to see all the processing messages.
Run Using a Script
Another way to run the DXM is to call the dxmRun.exe file from a batch file or a script. This allows you to import orders from your accounting system without any user intervention. For example, you can call the dxmRun.exe file every time you generate a single XML file or a header and detail delimited text file in your accounting or ERP system so there is no lag between the time the files are created and they appear in Shipping Solutions Professional as a new shipment record.
To run the DXM, run the dxmRun.exe executable file either from a script or at the DOS command prompt. When running the program, you will need to specify certain parameters depending on what kind of project you are running:
- Text File-Based Project: Project name, User Name (optional)
- XML File-Based Project: Project name, User Name (optional)
- Text Folder-Based Project: Project name, Full path of header file, full path of detail file, User Name (optional)
- XML Folder-Based Project: Project name, Full path of XML file, User Name
The User Name parameter is used to specify what Shipping Solutions User is assigned to the imported shipments. The user name parameter is optional and the Admin User Name will be used if not specified. The parameter must be specified as UserName=user. Use double quotes if the user name contains spaces, for example, “UserName=user one”.
For folder-based projects the full path to the file to be processed needs to be passed in as parameters. If the path contains spaces, it must be enclosed in double quotes so it is seen as a single parameter.
As an example, if you do not move any files from their default locations and you are running a project called Project1, the DOS command would be as follows:
- File-based project:
C:\> C:\Program Files\InterMart\SSProfessional_9\Applications\DXM\dxmrun\dxmRun.exe Project1 - File-based project with user specified:
C:\> C:\Program Files\InterMart\SSProfessional_9\Applications\DXM\dxmrun\dxmRun.exe Project1 UserName=user - Folder-based text-file project:
C:\> C:\Program Files\InterMart\SSProfessional_9\Applications\DXM\dxmrun\dxmRun.exe Project2 c:/DXMFiles/header.txt c:/DXMFiles/detail.txt - Folder-based XML project with user specified:
C:\> C:\Program Files\InterMart\SSProfessional_9\Applications\DXM\dxmrun\dxmRun.exe Project3 C:/DXM_XML_Files/shipment_1987.xml UserName=myuser
This command will read the setup files, locate the data files, and insert the shipment records into your Shipping Solutions Professional database. It will also move the data files to the processed file location and write to the sspro_dxm_logfile.txt log file in your project directory.
You may also add a line to a script file where you specify the DXM to run after your input has been created in your accounting or ERP system.
Run with the DXM Windows Service
Another way to run the DXM is by creating a Windows Service. The service will run continuously on your computer checking a specified folder at specified time intervals for any files that are ready for processing. Only folder-based projects can be run using the Windows Service.
To setup the Windows Service, navigate to the following folder on your computer: C:\ProgramFiles\InterMart\SSProfessional_9\Applications\DXMRunService. Double click on the setup.exe file, which will open the DXMRunService Setup Wizard. Click Next. On the Start Parameters window, enter your Project Name. This must exactly match the project name you have setup on the Setup Data Exchange Manager screen located on the Shipping Solutions Admin tab. Now enter the Time Interval in Minutes and the User Name.
The User Name should match one of the User Accounts created on the Shipping Solutions Admin tab. Shipping Solutions will use all the details associated with the Profile associated with that User Name such as the appropriate logo and signatures to place on the export forms for any incoming shipments. If you are using the single-user version of Shipping Solutions Professional, which does not allow you to set up multiple Users, enter “Admin” in this field or leave it blank. Click Next until the installation completes. Click Close.
The service is now running and will process any files in the specified folder. It will read the setup files, locate the data files, and insert the shipment records into your Shipping Solutions Professional database. Once the import is finished, the Service will move the data files to the processed file location you already identified and write to the sspro_dxm_logfile.txt log file in your project directory.
To confirm that the Service is running on your computer, open the Control Panel and search for Services. It is under Administrative Tools. Click View Local Services and look for the DXM Run Service (Shipping Solutions).
If you want to change the parameters of the Service, return to the Setup program. Uninstall the Service and then reinstall with the new parameters.
You can review the Service log files in the C:\ProgramFiles\InterMart\DXMRunService\Logs folder. Your folder may be called ProgramFiles(X86). The newest log file is DXMRunService.log. The older logs are numbered .1, .2, etc. with .1 being the next newest file.
Moving Your Project Files—Text or XML
If you want to run the DXM either from a script or as a Service on another machine, you will need to package up your DXM project and move it. On the Admin tab, Setup Data Exchange Manager screen, choose the Project you wish to move and then click the Edit button on the toolbar. From the Setup Data Exchange Manager window, click on the Package button. This will create a zip file of all the necessary DXM files in the location you specify. Copy and paste the zip file to the new location and then extract the files. The text or XML files identified in the project must have an equivalent path on the computer you are moving it to.
If you want to modify your project, you do not need to go back to Shipping Solutions. You can simply open the dxmmapping.exe file located in the C:\ProgramFiles\InterMart\SSProfessional_9\Applications\DXM folder that was included with the zip file.
Moving your Project Files—ODBC
Moving an ODBC project from one computer to another has to be done a little differently than the Text or XML file projects. Copy the entire DXM folder from one machine to another. The folder location is: C:\ProgramData\InterMart\SSProfessional_9\DXM. This will copy both the project folder and the necessary .dat files. You will also have to setup an ODBC connection from the source system.
DXM Testing Tools
The Data Exchange Manager includes tools that will review and validate whether or not the files you are generating from your accounting or ERP system are setup correctly to work with the DXM. We have included sample pipe-delimited files as well as an XML file that can be used for testing. You’ll find those sample files in the c:\ProgramData\InterMart\SSProfessional_9\DXM\TestData folder.
Validating XML Files
To validate your XML file, open the Setup Data Exchange Manager screen on the Shipping Solutions Admin tab, click on the Project you are working on, and click the Edit button on the toolbar. Now click on the Validate button on the toolbar. Now click the Scan File button. The Validator will run your file against the schema and list any errors it encounters in processing the file.
The XML Validator tends to be a bit pickier than the DXM, so it would be good practice to try running the DXM before reviewing the exceptions generated by the XML File Validator. If you have more than one file you wish to validate, you can click on the ellipsis next to the XML File field to search for and choose another file.
Validating Text Files
The Text File Validator will check your comma-, tab- or pipe-delimited text files generated from your accounting or ERP system to determine if there are any illegal characters or extra line feeds that will cause problems during the process of inserting the data in the Shipping Solutions Professional database.
To validate your delimited text files, open the Setup Data Exchange Manager screen on the Shipping Solutions Admin tab, click on the Project you are working on, and click the Edit button on the toolbar. Now click on the Validate button on the toolbar. Now click the Scan File button. The Validator will run your file against the schema and list any errors it encounters in processing the file.
If you have more than one file you wish to validate, you can click on the ellipsis next to the Text File field to search for and choose another file.
There is also a Validate button on the Mapping screen. This will scan the text-delimited files after they have been converted to XML.
For more information on the Shipping Solutions Data Exchange Manager, consult the Shipping Solutions User Guide. The Data Exchange Manager section is pulled out in a separate section for your convenience. You can also give us a call at (651) 905-1727.